
Pinup
Assignment 10.1:
Animated Axonometric Program Diagram
Create an exploded axonometric video of your ENV3 project. 30 seconds max.
In After Effects, use simple keyframe animations for transparency and position to explode the pieces. Show animated circulation paths to the guest rooms and public areas.
Using Rhino and Illustrator, create 2D assets (footage) to be animated in After Effects:
Show form and space details of the public areas. Show furniture, light fixtures, casework.
Show walls separating guestrooms (do not include details), corridors, public spaces.
Avoid having textures and imagemaps.
Include people.
Begin by quickly sketching out a storyboard of the animation. What does the exploded diagram look like? What are the exploded pieces? In what sequence do you reveal those pieces? When do you show the circulation?
Assignment 10.2:
Animated Concept Diagram
Create a short motion-graphics animation for your two Narrative and Spatial Concept Diagrams – 5.1 and 5.2. Final is due Week 12.
Storyboard of this animation is due Week 11.
Assignment 10.3
Storyboard for your final video (2:30 max)
Links to prior student examples here
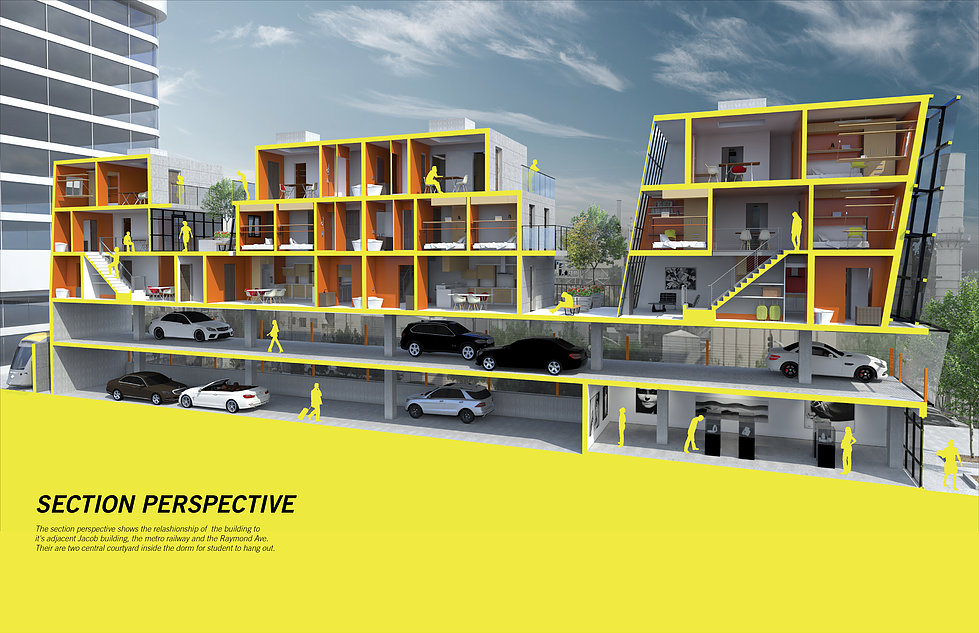
01 Section Perspective
Section Perspective Examples 1
Section Perspective Examples 2
YouTube tutorial part 1 – Rhino model prep
YouTube tutorial part 2 – Illustrator perspective grid
Steps:
Setup the view
-
- Find a good section cut using ClippingPlane
- Set the viewport property to Two-Point Perspective
- Adjust the lens length
- Save as a Named View
- Hide/delete everything not visible in the view
- Add fixtures, furnishings, equipment, people – use MeshOutline for detailed meshes
- Convert guest rooms to Blocks and make copies
- Split the model to render
Creating the section poche
-
- Recommended process (Illustrator only):
- Setup 1920×1080 artboard
- Import your render into Illustrator. Lock the layer.
- Trace the rendering in Illustrator and give it a fill
- Recommended process (Illustrator only):
-
- Using Rhino + Illustrator to create a section poche surface:
- Use the Section command to make the 2D section cut outline in line with your ClippingPlane
- Clean up the 2D poche outline using any combination of the following:
- In Rhino: use Rectangle, Trim, Fillet, Extend, Line, etc. to cleanup and join the lines. Then use PlanarSrf to create surfaces from the poche outline.
- Export the poche surfaces as .ai
- Setup 1920×1080 artboard in Illustrator
- Bring in your .ai Rhino poche surface file
- Import your render into the file. Lock its layer.
- First, use the Pen, Line Segment, and Shapebuilder tools as well as the Pathfinder palette to clean up poche areas.
- Second, use the Perspective Grid and Free Transform tool to help align the poche to the rendering.
- Using Rhino + Illustrator to create a section poche surface:
Assignment 12.1:
Section Perspective
Create a section perspective for your project.
Try to find a single section cut that simultaneously cuts through all of these:
- the whole building
- the pool area / courtyard
- a guest room
- a required public area
If you can’t cut through all of them simultaneously, try to at least have the them close to the foreground.
Try to capture complex and varied sectional spatial conditions.
Make your cut parallel to the building and structure.
Pinup Week 13
Final Presentation Deliverables for ENV3/DL3:
- 2.1 Vicinity Site Diagram
- 2.2 3D Analytical Site Diagram
- 4.4 Brand Video
- 6.1 Program & Circulation Diagram OR include program & circulation content in 10.1 Exploded Axon Animation
- 6.2 Presentation Board (recommend to end your presentation on this)
- 9.1 Three Dioramas
- 10.1 Exploded Axon Animation
- 10.2 Animated Concept Diagrams
- 12.1 Section Perspective (coming next week)
For your ENV3 final presentation, you will integrate diagrams from Design Lab 3 into your presentation. Include the items listed above.
Use them to help tell your design story. Use them to explain specific design decisions.